Carroll Fellow Spotlight
Jack Thiemel and his Summer CRIG
This summer, Forum students crafted a summer CRIG project that centered on Creativity, Risk, Independence, and Grit. CRIG projects, in general, are unrelated to academics, asking the students to thoughtfully engage in play. Students submitted monthly updates of their progress, that culiminated in a final goal/outcome at the end of the summer.
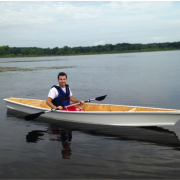
For Jack, his CRIG project came down to the following question, “Will she float?”
First Update: June 8, 2015
So far, I have ordered and read Boatbuilding For Beginners (And Beyond) by Jim Michalak. Of the designs suggested in the book, I have decided upon building a piragua – a flat bottomed boat which, upon completion, should be about 15ft long and weigh approximately 60 pounds. The piragua can hold two people and looks like a miniature canoe with small aft and forward decks.
To begin the project, I’ve thoroughly researched the different techniques for assembly once the stem, bulkhead, transom, etc. have been cut from the patterns. These include:
- Reverse Beveling – Using a table saw, or other method to create trapezoidal blocks that will reinforce the seams along the bottom of the boat.
- Drawing the Hull– Since the boat will have a pointed bow, I have to pull the wood with ropes to shape curve the originally flat panels.
- Installing Butt Plates – A method of joining multiple lengths of plywood using a shorter panel or “butt strap,” wood glue and clinched nails.
The next step of the project is to compare prices at lumberyards so that I can purchase wood at the cheapest price. I also plan to purchase a little extra wood so that I can practice the techniques above without having to return to the lumberyard.
Second Update: July 13, 2015
To be intentionally blunt: constructing this boat continues to be a much more time consuming task than I had originally assumed. In this third of the summer alone (June 8-July 13) I have spent easily 40 hours in construction. I find a silver lining in that I am learning at least as much about long-term planning as I am about basic carpentry. Not to diminish the progress I have made improving my carpentry skills, I now can construct butt straps, scarf lumber and skillfully use a table saw, jig saw, and circular saw.
As far as progress in construction goes, the hull is now nearly fully formed. I have attached the bulkheads to the side panels and successfully joined those panels at the bow and stern of the craft. All of the pieces of lumber/plywood that I will need to use have been cut, so the limiting factor on progress right now is how long it takes for each application of wood glue and eventually coat of paint to dry as I continue assembly
Remaining work: To complete the project, the boat must be lined with chine logs, sanded and painted. My new estimates, incorporating the speed of the steps taken so far, suggest that he boat will be ready to test in water somewhere between 1.5-2 weeks from today. Assuming that a preliminary water test goes well in Irondequoit Bay, I plan to take the boat on a trip to the Adirondack’s where I will use the boat to transport myself and gear to an island campsite where I will spend the night. I also have yet to decide upon a name. I think it wrong to settle on a name before I can see the craft fully formed.
Third (and final!) Update: August 18, 2015
This final update I have chosen to make in the form of a collection of photographs documenting the journey of building a boat. One note before we begin: in all of the photos excluding No. 6 & 9 the boat is upside down for ease of construction.
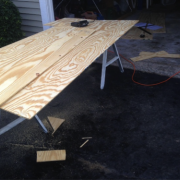
First, I cut the bottom, sides, bulkhead, and transom out of two 4×8 pieces of 3/8 inch plywood.
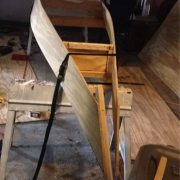
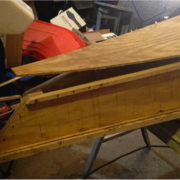
I then used nylon straps to pull the sides together around the bulkhead, creating the rounded hull you see in this photo. I secured the sides to the bulkheads using galvanized steel screws and a waterproof wood glue.
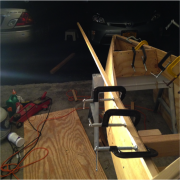
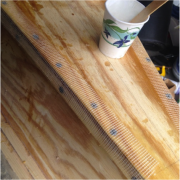
The next step was to attach two thinly cut boards that would stretch the full length of the boat. This stage presented a major challenge. By the time I cut the wood, it had dried out so much in my basement that is would snap instead of bending to fit the boat’s hull. To overcome this, I took two precautions. First, I wrapped the boards in wet towels for two hours so that they could absorb as much moisture as possible before bending. Secondly I cut the boards down the middle so that I was bending two 7 ft pieces for each side instead of one 14 ft piece. If you look closely you can see the seam between the two bottom-most clamps in the center of the photo. I then repeated this process twice on the top of the boat as well to reinforce the sides further.
Next, I secured the bottom by screwing it into the boards I attached in step 3.
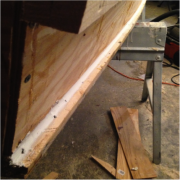
Next I used epoxy to seal a strip of fiberglass tape along the length of the boat to strengthen the joint. At this stage I turned over the boat and applied a bead of silicone caulk to the top of that joint to make up for any sloppiness in the original construction.
Fiber glass tape
Silicone caulk
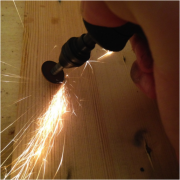
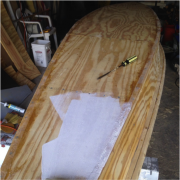
After all major pieces were secured I sanded the entire body of the boat to make it smooth (not photographed) and used a rotary tool to cut off the tips of screws that were poking through the hull in various places.
I next painted the hull with two coats of primer and one coat of oil based paint.
Finally, early on a Saturday morning, I took the boat out on Hundred Acre Pond in Mendon Ponds Park. I was on the water for about 30 min, long enough to row across the pond twice, totaling just over three quarters of a mile. The boat sprung no leaks and handled very well in the water. After careful consideration, I have decided on the name Homo Remigans or “Man, Rowing.”